整合 Mybatis
MyBatis-Spring-Boot-Starter 官方文档 http://mybatis.org/spring-boot-starter/mybatis-spring-boot-autoconfigure/
引入依赖
1
2
3
4
5
6
7
8
9
10
11
12
13
14
    <dependencyManagement>
        <dependencies>
            <dependency>
                <groupId>mysql</groupId>
                <artifactId>mysql-connector-java</artifactId>
                <version>8.0.27</version>
            </dependency>
            <dependency>
                <groupId>org.mybatis.spring.boot</groupId>
                <artifactId>mybatis-spring-boot-starter</artifactId>
                <version>2.2.0</version>
            </dependency>
        </dependencies>
    </dependencyManagement>
1
2
3
4
5
6
7
8
        <dependency>
            <groupId>mysql</groupId>
            <artifactId>mysql-connector-java</artifactId>
        </dependency>
        <dependency>
            <groupId>org.mybatis.spring.boot</groupId>
            <artifactId>mybatis-spring-boot-starter</artifactId>
        </dependency>
此处引入了 mybatis-spring-boot-starter,这是一个 mybatis 整合了 SpringBoot 的包,使用这个包可以极大地减少我们手动配置的工作量
配置
1
2
3
4
5
6
7
8
9
10
11
12
# mybatis映射文件路径配置
mybatis:
  type-aliases-package: org.oes.biz.entity
  mapper-locations: classpath:mapper/*.xml

# 如果你不想使用下一节中的Druid,需要添加以下数据源配置,否则不需要
spring:
  datasource:
    driverClassName: com.mysql.cj.jdbc.Driver
    url: jdbc:mysql://localhost:3306/oes_db?useUnicode=true&characterEncoding=UTF-8&useJDBCCompliantTimezoneShift=true&useLegacyDatetimeCode=false&serverTimezone=GMT%2b8
    username: root
    password: 123456
type-aliases-package 是实体类的包路径,在这里配置之后就可以在 Mapper.xml 文件中直接使用类名了,而不需要使用类的完整路径
mapper-locations 是 Mapper.xml 文件的路径,这些文件要放在 oes-biz 的 resources/mapper 目录下
还有 Mapper.java 没有扫描到,这些将会被放在 oes-biz 模块下(/oes-biz/src/main/java/org/oes/biz/mapper) 所以添加 @MapperScan 注解,指定包名
1
2
3
4
5
6
import org.mybatis.spring.annotation.MapperScan;

@MapperScan("org.oes.biz.mapper")
@ComponentScan("org.oes")
@SpringBootApplication
public class Application { ... }
为了便于区分不同环境下的配置,我们把 application.yml 进一步拆分,新建三个文件
application-prod.yml 生产环境配置
application-dev.yml 开发环境配置
application-test.yml 测试环境配置
以开发环境为例
1
2
3
4
5
6
spring:
  datasource:
    driverClassName: com.mysql.cj.jdbc.Driver
    url: jdbc:mysql://localhost:3306/oes_db?useUnicode=true&characterEncoding=UTF-8&useJDBCCompliantTimezoneShift=true&useLegacyDatetimeCode=false&serverTimezone=GMT%2b8
    username: root
    password: 123456
然后在 application.yml 中使用这个配置
1
2
3
4
5
6
7
8
# mybatis映射文件路径配置
mybatis:
  type-aliases-package: org.oes.biz.entity
  mapper-locations: classpath:mapper/*.xml

spring:
  datasource:
    active: dev
这样启动的时候就会默认加载 dev 配置,如果想要加载其他配置就可以在命令行中加入参数
生产环境启动 mvn spring-boot:run -Dspring-boot.run.profiles=prod
或 java -jar -Dspring.profiles.active=prod oes-start.jar
打包启动参见 OES之四:打包
代码
现在可以在 oes-biz 中写数据层的代码了
建好数据库表,建好与数据库表一致的实体类,如
1
2
3
4
5
6
7
8
9
10
11
12
13
14
15
16
17
18
19
20
21
22
23
24
25
26
27
28
29
30
31
32
33
34
35
36
37
38
39
40
41
42
43
44
45
46
47
48
49
50
package org.oes.biz.entity;

import java.util.Date;

public class Course {

    /**
     * 课程ID
     */
    private Long courseId;
    /**
     * 课程创建时间
     */
    private Date gmtCreate;
    /**
     * 课程修改时间
     */
    private Date gmtModified;
    /**
     * 课程分类 ID
     */
    private Long categoryId;
    /**
     * 开课教师 ID
     */
    private Long teacherId;
    /**
     * 开课时间
     */
    private Date gmtStart;
    /**
     * 结课时间
     */
    private Date gmtEnd;
    /**
     * 课程状态
     */
    private String status;
    /**
     * 是否免费
     */
    private String isFree;
    /**
     * 收费价格
     */
    private Long price;

    // getter 和 setter 省略掉了
    // ...
}
写一个 Mapper
1
2
3
4
5
6
7
8
9
package org.oes.biz.mapper;

import org.oes.biz.entity.Course;
import org.apache.ibatis.annotations.Param;

public interface CourseMapper {

    int insert(@Param("course") Course course);
}
写一个与这个 Mapper 类关联的 xml
1
2
3
4
5
6
7
8
9
10
11
12
13
14
15
16
17
18
19
20
21
22
23
24
25
26
27
28
29
<?xml version="1.0" encoding="UTF-8" ?>
<!DOCTYPE mapper PUBLIC "-//mybatis.org//DTD Mapper 3.0//EN" "http://mybatis.org/dtd/mybatis-3-mapper.dtd">
<mapper namespace="org.oes.biz.mapper.CourseMapper" >
    <resultMap id="BaseResultMap" type="org.oes.biz.entity.Course" >
        <id column="id" property="id" jdbcType="BIGINT" />
        <result column="gmt_create" property="gmtCreate" jdbcType="DATE" />
        <result column="gmt_modified" property="gmtModified" jdbcType="DATE" />
        <result column="category_id" property="categoryId" jdbcType="BIGINT" />
        <result column="teacher_id" property="teacherId" jdbcType="BIGINT" />
        <result column="gmt_start" property="gmtStart" jdbcType="DATE" />
        <result column="gmt_end" property="gmtEnd" jdbcType="DATE" />
        <result column="status" property="status" jdbcType="VARCHAR" />
        <result column="is_free" property="isFree" jdbcType="CHAR" />
        <result column="price" property="price" jdbcType="BIGINT" />
    </resultMap>

    <insert id="insert" parameterType="course">
        insert into course(gmt_create, gmt_modified,category_id,teacher_id,gmt_start,gmt_end,status,is_free,price)
        values (#{course.gmtCreate,jdbcType=DATE},
                #{course.gmtModified,jdbcType=DATE},
                #{course.categoryId,jdbcType=BIGINT},
                #{course.teacherId,jdbcType=BIGINT},
                #{course.gmtStart,jdbcType=DATE},
                #{course.gmtEnd,jdbcType=DATE},
                #{course.status,jdbcType=VARCHAR},
                #{course.isFree,jdbcType=CHAR},
                #{course.price,jdbcType=BIGINT})
    </insert>
</mapper>
关于 MySQL Type、jdbcType、Java Type 的对应关系请移步 MySQL、jdbcType、Java Type之间的映射关系
写一个 service 调用这个 Mapper
1
2
3
4
5
6
7
8
package org.oes.biz.service;

import org.oes.biz.entity.Course;

public interface CourseService {

    int createCourse(Course course);
}
1
2
3
4
5
6
7
8
9
10
11
12
13
14
15
16
17
18
19
package org.oes.biz.service.impl;

import org.oes.biz.entity.Course;
import org.oes.biz.mapper.CourseMapper;
import org.oes.biz.service.CourseService;
import org.springframework.stereotype.Service;

import javax.annotation.Resource;

@Service
public class CourseServiceImpl implements CourseService {

    @Resource
    private CourseMapper courseMapper;

    public int createCourse(Course course) {
        return courseMapper.insert(course);
    }
}
再写一个 Controller 调用这个 service 就可以启动项目来测试啦
整合 Druid
Druid官方文档 https://github.com/alibaba/druid/wiki
引入依赖
1
2
3
4
5
6
7
8
9
10
    <dependencyManagement>
        <dependencies>
            ...
            <!-- druid 数据库连接池 -->
            <dependency>
                <groupId>com.alibaba</groupId>
                <artifactId>druid-spring-boot-starter</artifactId>
                <version>1.2.8</version>
            </dependency>
    </dependencyManagement>
1
2
3
4
        <dependency>
            <groupId>com.alibaba</groupId>
            <artifactId>druid-spring-boot-starter</artifactId>
        </dependency>
配置
1
2
3
4
5
6
7
8
9
10
11
12
13
14
15
16
17
18
19
20
21
22
23
24
25
26
27
28
29
30
31
32
33
34
35
36
37
spring:
application:
name: oes # 项目名称
datasource:
type: com.alibaba.druid.pool.DruidDataSource
druid:
# 数据库连接设置
driver-class-name: com.mysql.cj.jdbc.Driver
url: jdbc:mysql://localhost:3306/oes_db?useUnicode=true&characterEncoding=UTF-8&useJDBCCompliantTimezoneShift=true&useLegacyDatetimeCode=false&serverTimezone=GMT%2b8
username: root
password: 123456
# 连接池配置
max-active: 20 # 最大连接数
max-wait: 6000 # 最大等待时间
min-idle: 1 # 最少连接数
test-on-borrow: true
test-on-return: true
# 监控配置
filters: stat,wall # 配置监控统计拦截的filters,去掉后监控界面sql无法统计,'wall'用于防火墙
aop-patterns: org.oes.biz.service.* #Spring监控配置,说明请参考Druid Github Wiki,配置_Druid和Spring关联监控配置
web-stat-filter: # WebStatFilter配置,说明请参考Druid Wiki,配置_配置WebStatFilter
enabled: true
url-pattern: /*
exclusions: /druid/*,*.js,*.gif,*.jpg,*.bmp,*.png,*.css,*.ico
session-stat-enable: true
session-stat-max-count: 10
principal-session-name: session_name
principal-cookie-name: cookie_name
profile-enable:
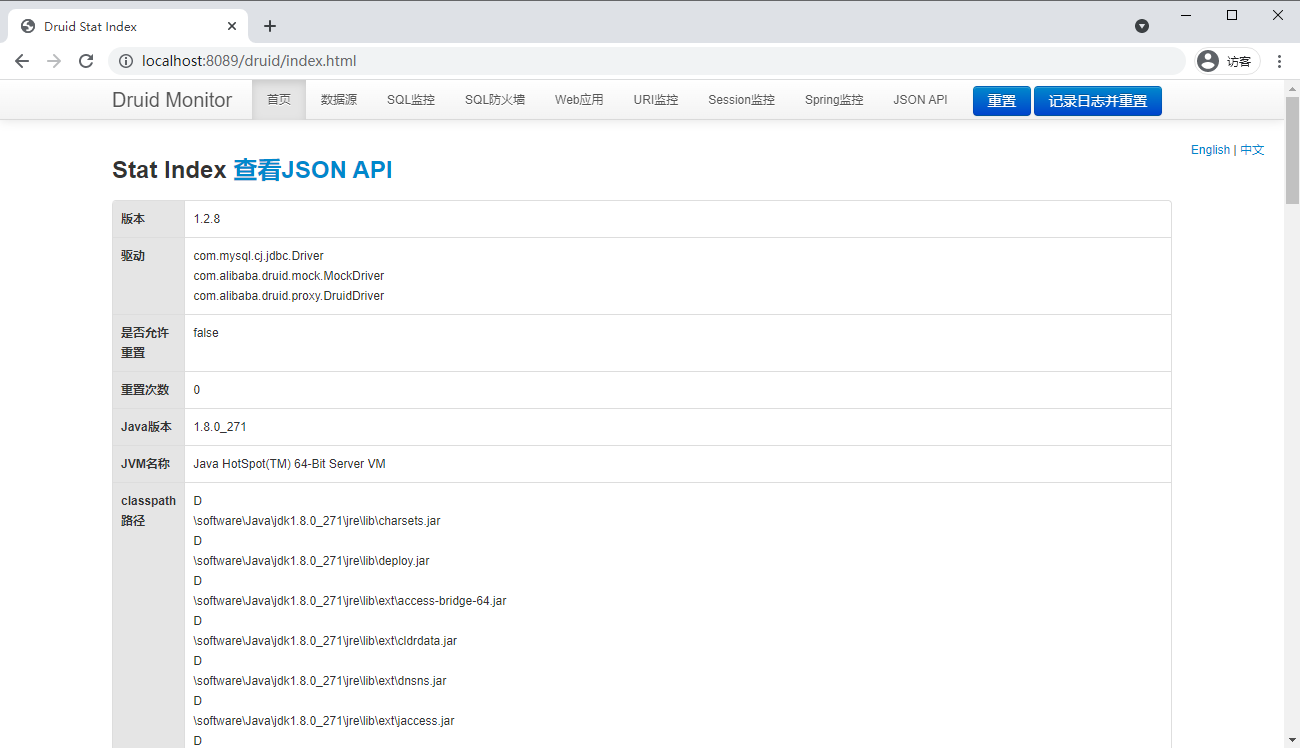
stat-view-servlet: # 监控统计页面,配置_StatViewServlet配置默认false
enabled: true
url-pattern: /druid/* # 配置DruidStatViewServlet
reset-enable: false # 禁用HTML页面上的“Reset All”功能
login-username: admin # 监控页面登录的用户名
login-password: 123456 # 监控页面登录的密码
allow: 127.0.0.1 #IP白名单(没有配置或者为空,则允许所有访问)
deny: #IP黑名单 (存在共同时,deny优先于allow)
此处的配置项较多,注释写的比较简单,具体可以参考官方给出的文档 alibaba/druid
启动
启动项目,控制台出现下图红框中的日志说明 Durid 配置成功

如果你在 yml 中配置启用了 stat-view-servlet,就可以访问 http://localhost:8089/durid 进入监控页面了(需要输入你配置的账号密码)
Mybatis 分页
TODO